Tuesday, December 27, 2016

A Catch Up and AHIQ - December 2016 edition

Merry Christmas to all my blog friends!  I hope you have a Happy New Year too!

Wow, what a busy month December has been.  Not a surprise at all, is it?  I am surprised that I'm managing one last blog post this year....Yay me!

We had a wonderful Christmas this year.  A little different, in that we did all our socializing on Christmas Eve which means we got to spend Christmas Day at home for the first time a in few years.  That was nice - very relaxed!  No schedule, no visitors, no stress.  I actually slept in until 12:30 in the afternoon!  It was the latest in the day that we've ever had Christmas.  We just had sandwiches for dinner.  And then we watched the Dr. Who Christmas Special.  A very lazy Christmas and I thoroughly enjoyed it.

I haven't done any sewing this month, other than some little snack bags for the granddaughters.  *sigh*  I really need to clean the quilt studio before I can do much more.  But, I do have some sewing to share.

After my last post, I thought I would share my Bullseye quilt to show what the raw-edge applique looks like after a few washings.


This quilt is about 15 years old now.  It's been washed lots of times.  This is the pattern called Bullseye based on the pattern in the book "Quilts From Aunt Amy" by Country Threads (Mary Tendall Etherington and Connie Tesene).  I didn't have the book or the pattern with me when I made this at a quilt retreat.  I didn't even have any circle templates.  I just cut the center out of a paper plate and made it up from there!  All of the fabrics I used have dots or circles of some kind on them, even the background fabrics.  


Here is a detail shot of two of the blocks.  You can see that the raw edges have softened and frayed some, but not as much as you might think.  Every once in a while, if it seems as if there are some big clumps of threads, I'll trim those down with some scissors.  But mostly the fraying doesn't bother me - I really like it!

Now that I think about it, I guess this quilt also qualifies as an improv quilt!  It is my favorite way to make a quilt.

Even my candy told me to do improv!

all four placemats
In September when I went to retreat in California, I took along this project.  I wanted to make some placemats, I needed something to demo bindings at the quilt show, and Katie wanted me to teach her something new,  So, I taught her how to do Debbie at A Quilter's Table's Cross-Cut quilt!  We had a lot of fun doing this process together.  I still want to do even more of this technique!

a truer representation of the fabric colors
I used royal blue and lime-y greens because I love those colors together.  

Katie's flimsie placemats

Katie decided to use brights with black, her fave combo.  She also cut her insert strips wider, about 1 1/2 inches, I think.  I cut mine at 1 inch.  

my inspiration page
The Tacoma Modern Quilt Guild had a color challenge this fall. due at the October meeting.  They had us choose a magazine page instead of a paint chip.  It was folded up and in an envelope, so we couldn't peek!  This page above was my choice, which I was happy about.
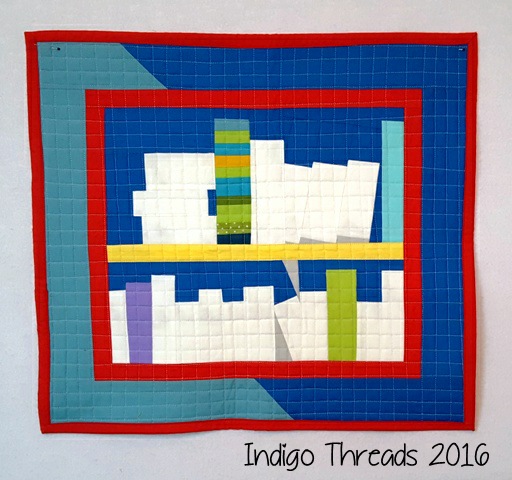
We had not-very-big size parameters and just had to do something that was related to the page, whether it was shapes or colors or any emotions the page evoked.

19" W x 17" H

Here is my challenge quilt.  Those books in the cases really spoke to me.  I'm not entirely pleased with this quilt - but I don't hate it either and it's DONE!.

the back of my inspiration page
the back of my quilt
I had to do the IKEA numbers fabric on the back!

If you want to see some of the other TMQG challenge quilt, click here.

For my birthday, my husband gave me a book I really, really wanted - Artful Improv by Cindy Grisdela.  I love her work - it really inspires me!
    

So, following her Building Blocks of Improv Design in the book, here is my first attempt at the Angled Stripes exercise.  I just picked the blues and greens that I liked, then added the hot pink for a zinger.

So, then I tried playing with various fabrics for the border.


the center is 10" W x 15" H
And you can see here that I tweaked my design some to be more interesting.

sorry for the terrible photo - it's so dark here
I think this is my final border choice.  I like the way the darker border color plays with the interior, making it more important.  Now I'm trying to decide on the final sizes for the sides.  I think they'll end up being 4 different sizes, just to make it more interesting.

Now I want to play with more of Cindy's exercises, particularly the curves!  I plan on doing more improv this coming year - it really is fun to do.  

I'm linking up with the Ad Hoc Improv Quilting.  Click here to see others' improv!

Wednesday, December 07, 2016

Show & Tell

I've never shown you the quilts I finished this year and displayed in my local guild's quilt show.  I've been such a slacker.

I wasn't as productive this year as I'd like to be, but I got 3 quilts done for the quilt show.  None of them are real big, but done is done!

First, I finally finished my 10 year old project!  It feels good to have this one done, and I'm looking forward to displaying this in my house after the holidays.

43.5” w x 54”h
This quilt is called "A Garden of Friends" and was made from blocks exchanged with my friends in California.  You can read more about this quilt here.


A closeup of the quilting, done by Shari Bahr, who also participated in this exchange.  All of the applique is raw-edge and it will fray when it's washed.  That makes even more lovely soft texture on the quilt!  


A detail shot of my liberated border. a la Gwen Marston.  Don't they look like little flags waving in the breeze?  I love those straight lines of quilting!


And a shot of the back, where I used up all the leftover bits from the border.  You can also see the lovely texture the quilting gives the quilt.

27" x 28"
This quilt is entitled "Love Notes From the Cat".  I know I've discussed this quilt on the blog before, but I can't find it to link for you.  I got the fabric from my sister, and it's so funny.  And too true.  I made the blocks improv-style, then had to use that cute cat fabric for the border.  I also used it for the backing.

left side of quilt

right side of quilt
These photos will supersize so if you double click on these photos, you can read the "love notes".

35" x 47"
And, just in time for the Christmas season, a new flannel quilt to snuggle with on the couch!  This was a "cheater" panel I bought a couple of years ago at a local quilt store.  I had planned on quilting this myself and never got to it.  And then it was "hiding" in a bag and got ignored.  So, when I was looking for quilts to finish for the show, I spied this one and decided it was time to get it done.  I added the red border and had Shari quilt this for me.  I briefly considered doing it myself, but I wanted it done for the quilt show and I knew that struggling to quilt this in August was really beyond me.  And Shari did a much better job than I would have!


A detail shot of the border.  Looks like there's a cold wind blowing!


And here's a photo of the backing with those cute ice skates and the wonderful flannel print I used for the binding.  I'm going to enjoy snuggling with this soon, as we've gotten cold weather now and actually had our first snow yesterday!

I fell in love with this fabric.  I had a pair of ice skates just like this when I was a kid in Michigan.  I inherited them from my older cousin Leslie.  I remember when I first got them, they were too big and I had to wear quite a few pairs of socks to get them to fit.  My sister and I went skating on the local lagoon.  Well, I mostly skated and she mostly fell down.  I wore those skates until they were so tight they were killing my toes!  Although, out in the cold while skating, my feet were numb anyway.  hee hee!   I was never really good at skating, but I had a lot of fun.

Well, I didn't get better from my icky cold last week, so I took myself to the Dr.  I was actually having an asthma-type thing going on as well as just being sick.  So I had a nebulizer treatment (a new experience for me), got some new inhalers and an antibiotic (for a sinus infection) and that helped.  I've been laying low ever since, and was starting to feel better.  I over-did yesterday, and didn't feel so good last night.  So, back to taking care of myself a little longer, I guess.  I need this to be gone before Christmas!

I did manage to do a little sewing for Block Lotto though!  It felt good to sew some.  Hopefully some more soon.  I have some Christmas secret sewing to do too!

Tuesday, November 29, 2016

Bad Blogger!

I've been AWOL around here, and I apologize for that.  Lots of things have contributed to that, but I won't bore you with that list.

I actually meant to post this back in October and for some reason never got around to it.  So, here goes!  Better late than never!

My hairdresser was going to have a baby, so of course I had to make her a quilt.  When she requested grey with brights, well, I knew that was right up my alley!

And I dithered about trying to decide on the BEST pattern to do for far too long.  I finally came to a decision.  I had so much fun doing my Mod 9-Patch that I thought a variation of that would be fun.   I was inspired by Kristy Daum's Parallel quilt pattern as well.  (Kristy's Modernized D9P is the tute  I used to make my Mod 9-Patch)


Here is my start.  Not too exciting yet, is it?

I realized that I'd used the red and the hot pink for all the corners, so then I made some more 9-patches with the background in the corners to break that up a little.  Just sewing by the seat of my pants, as usual.

Eventually I got it all done and even quilted it all myself.  It's not much fun to wrestle a quilt around under the presser foot in the summer heat, but I persevered and finished.  I quilted straight-ish lines vertically, which I like a lot.  Some of my spacing is a little goofy and it's not perfect, but that's OK.  I was more concerned with DONE.


Here it is, with DH being my quilt holder.  I think it came out OK!  


detail shot 1


detail shot 2


And here's a shot including the cute flannel I put on the back.  I love that zebra that you can almost see, so I thought the black&white binding echoed that, and it goes with the front well also.  

I put a label on it and gifted it to my hairdresser.  She loved it!

My local guild had our quilt show at the end of September, and I've had my annual post-quilt-show-loss-of-motivation.  It happens every year.  I started doing some random sewing, but I can't seem to concentrate on any of the projects I should be working on.  

I had to interrupt my sewing to do Thanksgiving host duties, and now I've gotten an icky cold with a terrible cough.  I don't even feel like going into the quilt studio, so I'm taking good care of myself this week, in hopes that the cold goes away soon.  I've got more to share with you of what I've done lately, and I hope to post more soon.  I'm just hanging out in the office with my computer and my vaporizer!  *cough* 

By the way, I saw on IG that Cheryl Arkison, co-author of Sunday Morning Quilts, is on The Quilt Show this week, and you can see it for FREE!  She demos both making slabs, and improv quarter circles (think Drunkard's Path).  Here's the link if you want to watch it.  I loved it!

Monday, October 17, 2016

Late to The Party, and Still Not Done!

Long time, no see.  Wow, my poor neglected blog!  I really didn't plan on being gone from it for so long, but what with one thing and another, blogging just kinda fell by the wayside.  I feel a little out of practice now.

I've been so busy and have had so much going on that I'm not sure where to even start.  So I'll just confine myself to the update on the Liberated Basket Medallion Quilt Along for now, since I'm a little late to the party.

Confession time:  I haven't been working on my Liberated Medallion quilts.  I had a quilt show to get ready for, and I went to a quilt retreat in California.  I knew I'd be late for the link up because the quilt show was the same weekend.  And then there were technical difficulties.

Tall Basket Medallion

I've decided that the "Tall Basket Medallion" is DONE.  It just looks complete to me, so I'm not going to try to do anything more to it.  So, for the "something fishy" round, I'll be putting some fish fabric on the back of the quilt.

Wide Basket Medallion
back to this stage!

As for the "Wide Basket Medallion", I've been unsewing!  I've removed the last round of wonky stars.  The more I looked at it, the more I didn't like it.  It just didn't "feel" right to me.  I like what I'd done so far (through the log cabin round), and I don't want to settle for just anything, just to be done in time for the Quilt Along.  Comments from both Quiltdiva Julie and Lynn at Patchery Menagerie confirmed what I had been thinking.  So, it is currently in pieces, waiting for my attention.  Back to the drawing board, as they say.

The technical difficulties was that, unfortunately, my poor Bernina sewing machine decided that she needed to go to the "spa" right before the quilt show.  It's been two weeks now. I sure miss my machine!  I've got 2 other machines (one of which also needs to go to the spa), but they're just not the same.  And I don't like to switch machines in the middle of a project because the seam allowances just won't come out the same, no matter what I do.   Hopefully she should be ready sometime this week.  *fingers crossed*  I'm still not sure quite what I'll be doing for the star border - the possibilities are swirling around my brain.  I'll be keeping the stars, and possibly adding more, but the rickrack border is gone and so are the "string" blocks.  I won't be working on this until my machine is home, so I've been thinking in the meantime.  While being involved in other things, of course!

I'll definitely be keeping you updated on any progress!

In the last 6 weeks I've been to California for a quilt retreat,  my guilds' had a (combined) big quilt show, I've made 2 or 3 other projects, and miscellaneous other stuff.  So, I have so much more to share with you, but it will have to be in other posts.  See you soon!

Friday, September 02, 2016

Gwennie-Inspired Medallion QAL - Star Border Reveal!

 I was so excited about this month's assignment of stars in this next border!  But it hasn't been an easy-breezy task, for some reason.  As much as I love liberated stars, I really struggled with these borders this month.  And I barely finished in time.  And now I'm posting a day late, but better late than never!

For lack of a better name, I've named my two quilts Wide Basket and Tall Basket, at least until I can think up better names!  (I'm open to suggestions)

Wide Basket 30 1/2 " x 30 1/2 "

I decided to work on the Wide Basket top first, as this quilt seems to be harder for me to design and work on.  Possibly because of the limited number of fabrics and colors?  Using solids?  Who knows?

I didn't have a clear idea of where I wanted to go for this border, which makes progress hard to achieve.   And it was like pulling teeth Every. Single. Step. of the way.  But I dug in my heels and made it work, gosh darn it.  I'm not entirely happy with it, but I can't tell you why.  This quilt is the epitome of Gwen's liberated adage "If it's too short, add to it and if it's too long, chop some off."  I had to do some of both this month.


I made stars, to get started.  These finish at 4 1/2 inches.


I made some more stars.  I played with placement.  Nothing clicked for me.  Then I decided that I didn't want stars all the way around the quilt.  I want this quilt to get taller, not wider.  (I did achieve square, so that's a step in the right direction.)  So I tried coming up with other ideas of what to do. Meanwhile, we were having a heat wave and it was too hot to be upstairs in the quilt studio.  So I only sewed in the evening when it started cooling off.  


More rickrack sounded good.  I like that.  Then, after I made one star of each fabric, there were still big gaps around the border.  So I started looking through Gwen's books.  Aha!  How about some strings?  Sounds good to me!  So I made strings.


For some unknown reason, I cut those strings too short.  Now what?  Add to them, of course.  And that is why my strings have an inner border of the gold.  To make them fit.  And it works.

These two stars look like they're holding hands while they dance!
If you look closely at this photo, you can see that I had to add to the strings to get them to fit the length of the border.  I was concentrating so much on design that I had no brain left for math to get things to fit together properly.  So, I totally faked it.


This green star is one of my favorites.  I accidentally grabbed the wrong green for that one star point, and now it is even more liberated!  It makes me smile.  ;)

So now I have to really put on my thinking cap and come up with something to fit the prompt for September: "something fishy".  That sounds challenging.  I have a glimmer of an idea though, so hopefully this month's border might go easier.

Wendy at the Constant Quilter has given us the 5th and final prompt for the QAL and here are her thoughts:

Being from Maine, my theme choice for the final border is
“Something Fishy”
As with those who have gone before me (Lori, Cynthia, Cathy and Katy), you can interpret this as loosely as you like. Here are a few examples:
Clamshells
Scallops
Fish fabric or appliques
Sea birds (they eat fish!)
Marine mammals (they eat fish too!)
Lighthouses (they see fish)
Boats (they catch fish)
Ovals and triangles (i.e. fish shaped)

So, Wendy's kind of left it wide open.  Possibilities!

Next up for some stars was the Tall Basket quilt.


This was my start.  I wanted to use the black polka dot fabric that I have in the center of each little log cabin for this "starry" border for some cohesion and to calm down that busy quilt a little.  I made very scrappy stars, because I love scrappy best.

Again, I didn't want stars completely surrounding the quilt top.  These little stars finish at 3 inches and take about 1/2 hour for each one.  They're fun to make, but they're not fast. 

Tall Basket 27" wide x 30" high
I love the way this came out!  I made the stars "dance" in the border, just to liven things up.  It's such a wild quilt top that ordinary just won't do.

side border detail

top border detail
Now to come up with "something fishy" for this top too!  Again, I have a little "seed" of an idea.  Hopefully it'll work out!

Be sure to go visit Lori's blog Humble Quilts to see the link-up for all the participants in the QAL.  There are some wonderfully fun and liberated medallion quilts being made!

Sunday, August 14, 2016

Ketchup!

This is going to be kind of a "catch-up" post this time because I have a lot to share with you.  This is going to be a long, photo-heavy post.


First up is a scrap project I've been working on.  I have a drawer in my cutting table that I've been putting 2 1/2 inch squares in as I'm cutting fabrics.  After quite a few years, it was getting pretty full.  I've been working on sewing them into "two-sies" for a while now.  I've kept changing my mind as to what quilt pattern they would become....there are so many possibilities!  4-Patches, 9-Patches or what??  I played with lots of ideas.  Then one day, my shoe box that I keep the "two-sies" in got too full to close and it was time for a decision.

Meanwhile I had seen this link from Ebay on Facebook:


This old beauty was intriguing to me.  I finally figured out what this block design is.  The big clue was that the blocks are set on point.  So, after a little while with a pencil and some graph paper, I had it figured out.

This is the block:

This is really just a rough sketch.  Imagine background rectangles in place.  The block will finish at 8 inches square.  That's gonna be a lot of 2 1/2 inch squares!  The inspiration quilt uses half square triangles, but since I already had plain squares sewn together, I thought I'd just keep it simple and use those.  I think there are a few HST's in there as well, just because they were in the drawer.  I'm using scrappy white-on-whites for the backgrounds.

I started out doing the "kitchen sink" approach and using any of my older fabrics in my squares, but when push came to shove, I had to edit out the old ugly fabrics that I just couldn't stand any more. Some of those squares actually went into the trash!  I figured "Why make a quilt with fabric that I don't love, when there is so much that I do love?" Right?  That still leaves me with a lot of 2 1/2 inch squares!  And I can always cut some more if I need to.

So this is now my latest long-term project.  I have a number of blocks sewn, as you can see in the top photo, but lots more to go.  And no rush on this, I'm just using up my scraps.  Really, only some of my scraps!  And now it's time to start cutting more 2 1/2 inch squares to replenish my stock of them.

I've also sewn some preemie quilt tops.  I still need to get them quilted up.


This was just left-over bits and pieces that I inherited from a friend 9 years ago.  Finally getting it together!


Remember back in April when I posted about playing with the Rail Fence block from Sujata's book? You can see my post here.  (scroll down a ways)  I determined that, to use the fabrics I wanted, I need to make a 14" block.  Well, this was my sample block to see if my math for the conversion was correct.  And, it's a miracle - the block came out the perfect 14 inch size!  Each Rail Fence unit in the block is a 3 1/2 inch square.  See, amazing math skillz!  I used an older true Madras plaid and a solid for this one.  This block didn't need much more to be the right size for a preemie quilt, just a couple of borders.  (The target size for a preemie quilt is 18" x 24").


I had more fabric left over, so I made one more to use it up.  This is a little different, but I hope someone enjoys it.  Now, on to the quilting.

The Tacoma Modern Quilt Guild was having a summer event to show off some of our quilts and sell some small items, so I made some potholders.  I was thrifty and recycled some bits and blocks as well as using some fun fabric.


Each of these is a one-of-a kind potholder.  Two are string blocks from the string bin.


Also one-of-a-kinds.  Leftover 8 inch squares from The Parts Department.


These two were someone's leftover strip sets that  I rescued from the quilt shop.  They're a set of two and are two sided with the same fabrics.


Another two pairs of rescued strip sets potholders and the top two potholders are also pairs (one blue pair, one red pair) of some cheater selvage fabric. 


The top left is a pair of potholders of left-over charm squares that I "inherited", while the top right pair uses some left-over 9-patches, also "inherited".  The bottom two are two pairs of a different cheater selvage fabric. 


All of the potholders!

Now I need to make more potholders for the other guild's upcoming quilt show, to sell at the Country Store we have at the show.  It's a good thing potholders are fun and fast!

I also did some "secret" sewing, for next year's Challenge quilt.  The challenge is ""Get Creative with Black"!  You'll have to wait until next July to see the results of that.


Now I have 3 quilts back from Shari, my long-armer, to get bindings on for the quilt show!  They need to be turned in mid-September for the show at the end of that month.  I was a slacker this year and only finished these 3 quilts.  My reveal of these quilts will be when the bindings are on, so stay tuned!

For my sewing this month I have to do those three bindings, make potholders and maybe some bags, make a baby quilt and work on my Liberated Medallion QAL quilt tops.  I hope I can do it all!  If the weather stays a reasonable temp, I can stand to be in the quilt studio.  It's cooled off today from the last 2 days, so that's where I'm headed now.